
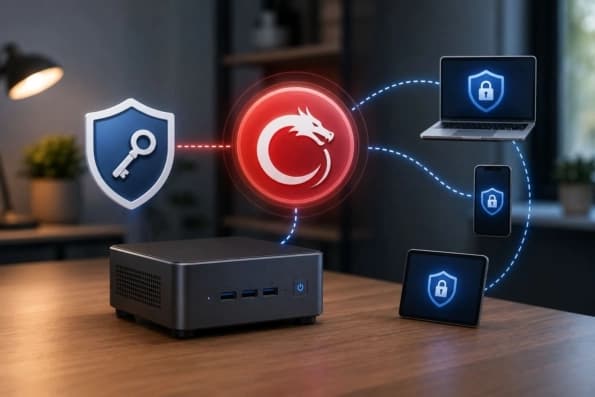
Before WireGuard, only network engineers could set up their own VPN servers because it was too hard for regular people. You can make a fast, safe tunnel into your home network that is on par with expensive commercial services if you have a spare mini PC and some time. This guide will show you how to set up a WireGuard server on a mini PC so you can access your files, protect your public Wi-Fi, and maintain complete control over your online privacy from anywhere in the world.
Key Takeaways
| Feature | Why It Matters |
| Speed | WireGuard is significantly faster and more efficient than older protocols like OpenVPN. |
| Simplicity | The codebase is tiny, making it easier to audit and less likely to have security holes. |
| Privacy | Self-hosting means you aren’t trusting a third-party company with your browsing data. |
| Cost | Running it on a low-power mini PC costs just a few dollars a year in electricity. |
What Is WireGuard (and Why Run It on a Mini PC)?
To put it simply, WireGuard is a new VPN protocol that is made to be quick, easy, and light. OpenVPN has hundreds of thousands of lines of code, but WireGuard only has about 4,000 lines. Because it is “thin,” it connects almost instantly and does not put much stress on your hardware. It is like making a private “back door” into the home network that only you can open when you run your own server on a mini PC.
Why would you pick a mini PC over the VPN that comes with a router? The processors in most home routers are not very strong, so they have trouble encrypting traffic at high speeds. A dedicated mini PC, even a basic one, has a lot more “grunt” to handle many encrypted streams without any problems. Aside from that, mini PCs use very little power and are very quiet, which makes them ideal for a 24/7 VPN server. It is better than a paid VPN because you do not have to share a server with tens of thousands of other people, and you can connect directly to your local devices, like NAS drives or smart home hubs.
What You Can Do With a Self-Hosted WireGuard Server
What makes a self-hosted WireGuard server powerful is its flexibility. When it is ready, you can safely connect to your home network and homelab services from anywhere, such as a Melbourne café or during a London business trip. As if you were sitting on your own couch, you can get to your files, security cameras, or a local media server.
It is also a shield for safety. You can “tunnel” all of your traffic back through your home connection when you are in an airport or hotel building with public Wi-Fi. Hackers on the same Wi-Fi can not look at your data this way. You can also route your traffic back through your Australian IP address while you are travelling, so you can still use local services and content as if you were at home. It is about taking the digital security of your home with you when you leave.
Before You Start: What You Need
The Mini PC (Your Always-On VPN Server)
To run WireGuard, you do not need a monster computer. The protocol works so well that even a simple mini PC can easily handle the job as a home server. Find something that has a stable Ethernet connection and at least 4GB of RAM. Even though Wi-Fi works, a wired connection is always better for a server because it has the least latency and is more reliable.
A Public IP — or a Way Around CGNAT
Your router needs a “public” face so that people outside of your home can connect to it. Most Australian NBN providers offer a public IP address that changes all the time. As a result, a lot of cheap internet service providers use CGNAT, which puts you behind a big “shared” router and does not let you “call home” directly. If you have a public IP, you should ask your ISP. Do not worry if you don’t—we will talk about how to get around this later in the guide. PCMag’s technical comparisons say that for self-hosting, having a direct public IP address is the “gold standard.” However, there are now ways to get around this problem that make it less of a dealbreaker.
Software: Linux and WireGuard
Your server will work better and be more stable if you run it on Linux. It is best to use a light distribution like Debian or Ubuntu Server. Since WireGuard is now part of the Linux kernel, it works very quickly and efficiently. We will show you the exact commands you need to get the job done, but you will also need to know how to use the command line. How to Set Up a WireGuard Server on a Mini PC, Step by Step
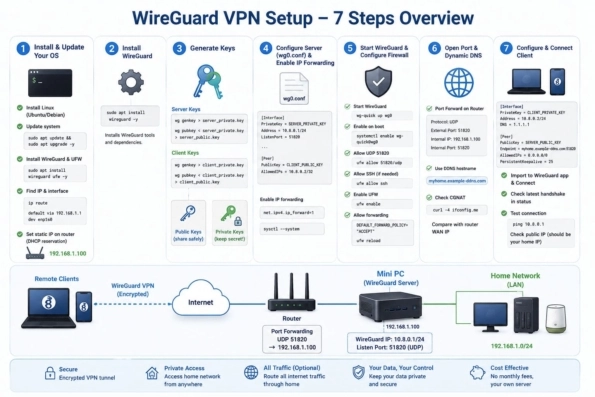
STEP 1 Install and Update Your OS
First, put the Linux OS of your choice on your mini PC. Ubuntu Server or Debian are both good choices. After installing something, the first thing you should always do is make sure it is up to date.
Start up your terminal and type:
sudo apt update && sudo apt upgrade -yYou should also install WireGuard and UFW:
sudo apt install wireguard ufw -yBefore moving on, find your mini PC’s local IP address and network interface:
ip route
You will need this information later when setting up the firewall and NAT.
It is also a good idea to give your mini PC a fixed local IP address,
such as 192.168.1.100, through your router’s DHCP reservation.
STEP 2 Install WireGuard
Most modern Linux distributions make it easy to install WireGuard. Type this into your terminal:
sudo apt install wireguard -yIt will get the WireGuard tools and any dependencies they need from the official repositories. That little package should be ready in no time.
STEP 3 Generate the Server and Client Keys
Public-key cryptography is what WireGuard uses to keep its connections safe. Each client, like your phone or laptop, will need its own set of keys, one private and one public. One set of keys will be for the server.
Create the WireGuard directory:
sudo mkdir -p /etc/wireguard
cd /etc/wireguard
Generate the server keys:
sudo sh -c 'umask 077; wg genkey > server_private.key; wg pubkey < server_private.key > server_public.key'Then generate a separate set of keys for your client:
sudo sh -c 'umask 077; wg genkey > client_private.key; wg pubkey < client_private.key > client_public.key'STEP 4 Configure the Server
Now you need to create the configuration file for the server.
Create a file named wg0.conf in /etc/wireguard/.
Open the file:
sudo nano /etc/wireguard/wg0.confThen add:
[Interface]
PrivateKey = SERVER_PRIVATE_KEY
Address = 10.8.0.1/24
ListenPort = 51820

PostUp = iptables -A FORWARD -i wg0 -j ACCEPT; iptables -A FORWARD -o wg0 -j ACCEPT; iptables -t nat -A POSTROUTING -o enp1s0 -j MASQUERADE
PostDown = iptables -D FORWARD -i wg0 -j ACCEPT; iptables -D FORWARD -o wg0 -j ACCEPT; iptables -t nat -D POSTROUTING -o enp1s0 -j MASQUERADE

[Peer]
PublicKey = CLIENT_PUBLIC_KEY
AllowedIPs = 10.8.0.2/32
Replace SERVER_PRIVATE_KEY,
CLIENT_PUBLIC_KEY, and enp1s0
with your own values.
You also need to enable IP forwarding so the server can pass traffic from the VPN to your home network and the internet.
sudo nano /etc/sysctl.d/99-wireguard.confAdd:
net.ipv4.ip_forward=1Then apply the change:
sudo sysctl --systemSTEP 5 Start WireGuard and Configure the Firewall
Now start WireGuard:
sudo wg-quick up wg0Check that everything is working:
sudo wgIf everything looks good, make WireGuard start automatically when the mini PC boots:
sudo systemctl enable wg-quick@wg0Your firewall also needs to allow WireGuard’s UDP port:
sudo ufw allow 51820/udpIf you use SSH to manage the mini PC, allow SSH before enabling UFW:
sudo ufw allow ssh
sudo ufw enableSTEP 6 Open the Port and Set Up Dynamic DNS
Now that your mini PC is ready, the connection is probably being blocked by your router. Go to your router’s settings and forward UDP port 51820 to your mini PC’s internal IP address.
UDP 51820 → 192.168.1.100:51820Your mini PC’s firewall also needs to allow this port, which you configured in Step 5.
If your home’s public IP address changes, a DDNS service can give you
a permanent hostname, such as myhome.ddns.net.
STEP 7 Configure and Connect a Client
The last step is to create a configuration file on your client, such as your phone or laptop.
For a full-tunnel VPN, use:
[Interface]
PrivateKey = CLIENT_PRIVATE_KEY
Address = 10.8.0.2/24
DNS = 1.1.1.1

[Peer]
PublicKey = SERVER_PUBLIC_KEY
Endpoint = myhome.ddns.net:51820
AllowedIPs = 0.0.0.0/0
PersistentKeepalive = 25
Replace the keys and DDNS hostname with your own values. Import the configuration into the WireGuard app on your phone or laptop and press Connect.
Check the WireGuard status on the server:
sudo wglatest handshake and data transfer,
your client is successfully connected to your private VPN.
If you configured AllowedIPs = 0.0.0.0/0,
your client’s internet traffic will also go through your home connection.
What If You’re Behind CGNAT? (No Public IP)
There is no way to forward ports if your ISP uses CGNAT, which is a lot of NBN providers like Aussie Broadband and TPG. You can not “call” a specific public IP address. But there are two great choices for you. First, you can ask your ISP for a “Static IP” or to be taken off of CGNAT. For a small monthly fee, many will do this.
Another choice is to use an “overlay” network, such as ZeroTier or Tailscale. Under the hood, these services use WireGuard, but they do all the complicated “hole punching” to get around CGNAT on their own. Australians who want the security of WireGuard without having to deal with their ISP’s network configuration will find this a very good option. It is like “WireGuard with training wheels,” and for most home users, it works great.
Securing Your WireGuard Server
Even though WireGuard is safe by nature, you should still keep your mini PC safe by following best practices. Always use unique, strong keys. Always have the most recent security patches installed on your Linux OS. If you are an advanced user, you may want to set up a VLAN homelab to keep your VPN server separate from your other sensitive home devices. This makes sure that even if someone got into the VPN, they would not be able to get into your whole network right away. There are many parts to security, and your VPN server is only one of them.
WireGuard vs OpenVPN vs a Router’s Built-In VPN
How does WireGuard compare to other things on the market? Tech Insider’s 2026 tests show that on the same hardware, WireGuard can be up to three times faster than OpenVPN in terms of raw speed. Even though OpenVPN is a mature and tried-and-true protocol, it is slower and uses more resources because it is more complicated.
A dedicated mini PC gives you a lot more control than the VPN that comes with a router. Most routers have very few configuration options and use older versions of VPN protocols. You can easily manage multiple clients, set up complex routeing rules, and make sure you are always running the newest, safest version of the software if you host on a mini PC. With a custom-tailored security tool, it is not a “one-size-fits-all” solution.
Troubleshooting Common WireGuard Problems
If you can’t get a connection, don’t panic. Here’s a quick checklist of the most common issues:
- No Handshake: This is usually a problem with port forwarding or the firewall. Both your router and mini PC should have UDP 51820 open.
- Connected but No Internet: You probably forgot to set up your firewall’s NAT rules correctly or forgot to enable IP forwarding on the server.
- Works on Wi-Fi but Not Mobile: This is a classic sign of a CGNAT issue or an MTU (Maximum Transmission Unit) mismatch. Try lowering the MTU in your client config to 1280.
- Intermittent Connection: If you’re behind a NAT, use the PersistentKeepalive = 25 setting in your client config to keep the tunnel open.
Frequently Asked Questions
Is a mini PC good for a WireGuard VPN server?
Yes, it’s arguably the best hardware for the job. Mini PCs are powerful enough to handle high-speed encryption, yet they use very little power and are silent, making them ideal for 24/7 operation.
Can I run a WireGuard server on a mini PC behind CGNAT?
Yes, but you’ll need a workaround. You can either pay for a static IP from your ISP or use an overlay network like Tailscale, which uses WireGuard but bypasses the need for port forwarding.
Do I need a static IP for WireGuard?
No, you can use a Dynamic DNS (DDNS) service. This gives you a hostname that stays the same even when your home’s IP address changes, allowing your VPN client always to find its way back home.
Is WireGuard faster than OpenVPN?
In almost every scenario, yes. Because it’s built into the Linux kernel and has a much simpler design, WireGuard offers lower latency and higher throughput than OpenVPN.
Is a self-hosted VPN safe?
It is very safe if configured correctly. Because you own the server and the keys, you don’t have to worry about a third-party company logging your data or being compromised. Just keep your OS updated!
How much power does a mini PC VPN server use?
Most modern mini PCs used for this purpose draw between 5W and 15W of power. In Australia, this equates to roughly $20-$40 per year in electricity, depending on your local rates.
Set Up Your Own WireGuard Server on a Mini PC
One of the most fun things you can do for your home network is build your own WireGuard server. There is no way that paid services can compare to its speed, safety, and freedom. If you build your private tunnel around a reliable, low-power mini PC, it will always be ready for you when you need it. An independent WireGuard server is the best thing for today’s digital life, whether you need to protect your data while you are travelling or just need a safe way to get to your home files. Right now, protect your privacy and test how fast your home network can really go.