
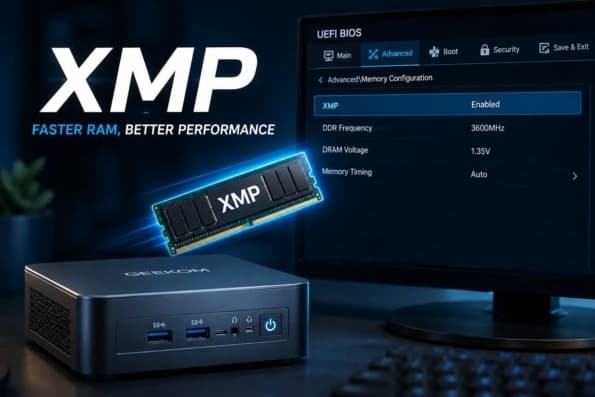
What Is XMP in BIOS? XMP is a memory profile in your BIOS that you can switch on with a single click. It runs your RAM at the speed printed on the box rather than the slower default. Without it, many kits stay on the safe JEDEC settings. Turning XMP on loads the tested frequency, timings and voltage so you actually get the performance you paid for — which is especially handy for gaming, content work and heavy multitasking.
Main Points
- Extreme Memory Profile (XMP) lets you set the speed, timings and voltage of your RAM modules.
- Most kits boot on JEDEC defaults until you turn on a profile (XMP, EXPO or DOCP) in the BIOS/UEFI.
- Profile 1 usually runs at the advertised speed — no need to work out the timings by hand.
- Check the QVL, update the BIOS if needed, then confirm the speed in Task Manager or CPU-Z.
- Stock profiles are generally safe, but memory overclocking can affect your warranty terms and be less stable if your kits don’t match.
What Does XMP Do?
XMP stands for Extreme Memory Profile, and Intel created it. Memory makers store ready-made performance settings on a small chip on each module (the SPD). When you turn the option on in the BIOS, the board reads those presets and applies them automatically. When RAM first powers up, it defaults to fail-safe JEDEC settings — that gives you broad compatibility, but the default speed is often slower than the product label claims. XMP fills that gap: one toggle loads the manufacturer’s proven mix of frequency, latency timings and voltage. On many boards you’ll see the same feature under a different name — A-XMP (MSI) or DOCP (ASUS AMD boards), for example. They all do the same job: load saved settings that make your RAM run faster.
How XMP Profiles Make RAM Run Faster
Faster RAM helps your CPU move data more quickly. That can make heavy multitasking feel snappier, lift frame rates in CPU-bound games, and cut export and render times. The gains depend on the workload; bandwidth-heavy tasks usually benefit more than GPU-heavy games. TechRadar notes that DDR4 typically runs close to the JEDEC baseline of 3200 MHz, while higher-end kits can be rated well above that — so with the profile off, you may not be using that rated performance. For DDR5, retail kits often advertise 6000 MT/s or faster, yet they still boot at a slower JEDEC rate until you apply a profile. These presets also tighten the timings and set the correct voltage so the higher clock rate stays stable, saving you from typing a long list of latency values by hand. Kits usually ship with Profile 1, but with XMP 3.0 (DDR5) you may get extra tuned profiles to choose from. Either way, understanding the difference between DDR4 and DDR5 still matters for capacity and platform choice, but once you pick the right profile, you get the speed you paid for.
Check These Things Before You Turn On XMP
Before you change any BIOS settings, make sure of the following:
- Profile-capable RAM: look for an Intel XMP badge, or an XMP/EXPO listing on the product page.
- Motherboard support: most Intel Z/B boards and AMD boards with DOCP/EXPO show the toggle, though some entry-level boards don’t allow memory overclocking.
- CPU support: a CPU’s official specs list the fastest memory speed it officially supports. Higher speeds usually work, but not on every chip.
- QVL match: look for kits on your motherboard’s Qualified Vendor List (QVL).
- Up-to-date firmware: older BIOS builds can hold back DDR5 speeds. Updating the BIOS before you turn on the profile makes odd boot problems in Windows 11 easier to avoid.
- Modules in the right slots: fit a matched kit in the slots your manual specifies (usually A2/B2 for dual channel). Sort that first if anything doesn’t work — unsupported hardware usually fails to boot or drops speed rather than handing you free performance.
How to Turn on XMP in BIOS, Step by Step
From ASUS to MSI, Gigabyte, ASRock and OEM boards, the menu names differ, but the process is the same.
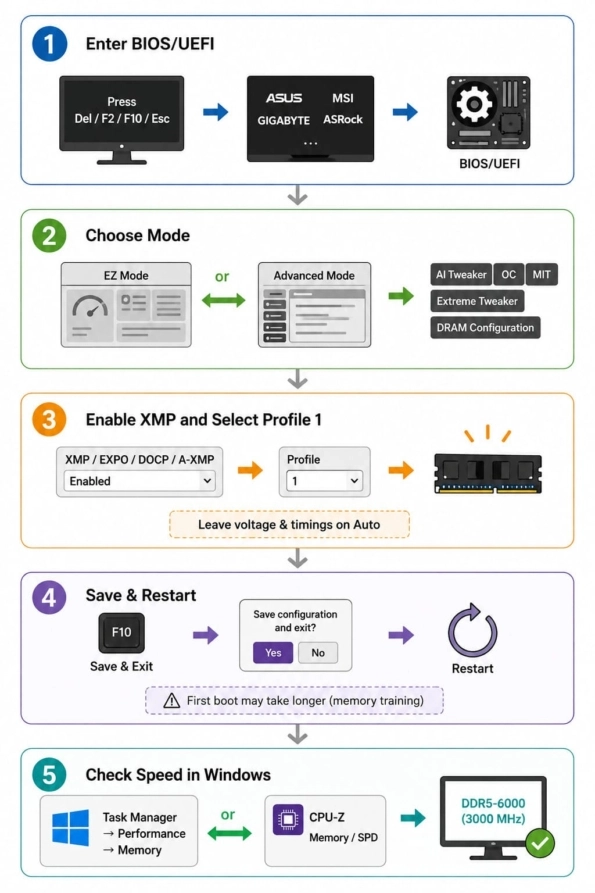
Step 1: Restart and enter the BIOS/UEFI
Restart the computer and, as soon as the logo appears, press the key shown on screen — usually Del, F2, F10 or Esc. Tap it a few times to reach the firmware UI. If Windows loads instead, restart and try again, or go to Advanced Startup and choose UEFI Firmware Settings.
Step 2: Choose EZ Mode or Advanced Mode
Many boards show the XMP, EXPO and DOCP switch right there in EZ Mode. If you only see basic options, press F7 to enter Advanced Mode and look under the AI Tweaker, OC, MIT, Extreme Tweaker or DRAM Configuration tabs.
Step 3: Turn on XMP and pick Profile 1
Enable Extreme Memory Profile (or DOCP/EXPO/A-XMP) and set Profile 1, which usually carries the highest rated speed and timings. If you’re not tuning manually, leave the voltage and sub-timings on “Auto.” Don’t stack any custom overclocks on top until the base setting is stable.
Step 4: Save your changes and restart
Press F10 (or Save & Exit), confirm, and press F10 again to restart. After a memory change, the first boot can take longer because the board has to train the DIMMs — don’t cut the power during training. Many boards revert to the previous settings if the system fails to POST more than once; if that doesn’t sort it, clear the CMOS using the jumper or button described in your manual.
Step 5: Check the speed in Windows
Open Task Manager → Performance → Memory to see the speed, or use CPU-Z’s Memory/SPD tabs. In CPU-Z, the DRAM frequency is usually half the DDR data rate, so 3000 MHz is roughly DDR5-6000. If you still see the old JEDEC speed, go back into the BIOS and confirm your changes were saved.
What’s the Difference Between XMP and AMD EXPO?
Both load a saved high-speed memory profile from a single BIOS setting; the main differences are platform branding and tuning, not how RAM fundamentally works. XMP (Extreme Memory Profile) is Intel’s technology and supports both DDR4 and DDR5. EXPO (EXtended Profiles for Overclocking) is AMD’s equivalent, aimed mainly at AM5/DDR5. To use them, you enable XMP Profile 1 (or higher) on Intel, or EXPO Profile 1 on AMD — sometimes labelled DOCP or A-XMP on the board. The goal is the same either way: reach the advertised speed, timings and voltage. On ASUS AMD boards the label may be DOCP or EOCP, and many DDR5 kits are dual-certified for both XMP and EXPO. As a rule of thumb, use XMP on Intel and EXPO on modern AMD where it’s offered — and if your BIOS only gives you one option, use that one; it’s usually the safer choice.
Is It Safe to Turn On XMP?
For most people, running a stock profile is considered safe as long as the kit, board and CPU all support it. Vendors validate these presets, so loading one isn’t the same as setting clocks at random. TechRadar describes it as a safe, stable way to reach the advertised frequencies compared with unguided manual overclocking. Relative to JEDEC, though, it’s still memory overclocking. Intel notes that changing frequency or voltage beyond spec — including by enabling Extreme Memory Profile — may affect your processor’s warranty, so read the warranty terms for your CPU and board if that matters for your build. Untested custom profiles, mismatched sticks, extreme kits on entry-level boards, or ignoring instability (reboots, WHEA errors, app crashes) all raise the risk. Start with Profile 1, and if something feels off, drop to a milder setting or back to JEDEC.
Fixing Problems with XMP
If the PC won’t start, throws a blue screen, or still shows the old speed after you enable the profile, these steps should help:
- Wait for training to finish — let the computer restart a few times before you clear the CMOS.
- If Profile 1 won’t work, try Profile 2, a safer profile that can still train.
- Update the chipset drivers and BIOS — especially important on early DDR5 boards.
- Power down, remove the modules, and reseat them in the correct slots.
- Drop the frequency one step, or turn the profile off temporarily, to confirm the system is otherwise healthy.
- Test each stick one at a time to find a faulty module or slot.
- Check the QVL and DIMM count — four high-speed sticks are harder to train than two.
- Clear the CMOS: reset to defaults, restart, then reapply only the memory profile. If something keeps failing, it’s usually because the CPU’s memory controller or the motherboard can’t handle that kit’s rating — not because the profile damaged the RAM.
When Should You Enable XMP?
Turn it on when:
- Your kit is rated faster than the JEDEC baseline and you want that speed.
- You play CPU-heavy games, edit video, compile code or run virtual machines — where bandwidth and latency matter.
- Your board supports XMP, EXPO or DOCP and your kit is on or near the QVL.
- You’ve just updated the BIOS on a new DDR5 platform.
Leave it off when:
- The rated speed already matches the JEDEC default you’re running.
- A small performance gain matters less on a machine that runs 24/7.
- The system is unstable at the top profile but stable at any lower setting.
For most home and creator PCs, switching on XMP or EXPO after a new build or a RAM upgrade is one of the best BIOS changes you can make in a couple of minutes.
FAQs
Should I turn XMP on or off?
If your kit is rated faster than the default JEDEC speed and your board supports profiles, leave XMP on — that’s how you reach the advertised speed. Turn it off only when you need to troubleshoot or when you want the safest possible settings.
Is XMP okay for my RAM?
Manufacturers test stock XMP profiles to make sure they’re safe for daily use on supported hardware, raising the voltage and clocks in a controlled way. Most of the time, instability just points to a platform limit rather than permanent damage. If problems crop up, turn the profile off or switch to a milder one.
Does XMP speed up your PC?
Yes, for tasks that want more memory bandwidth or lower latency — many games, creative apps and heavy multitasking. The boost varies from title to title, and if your GPU is the bottleneck, you may see smaller gains, but you’ll still be getting the speed you paid for.
Do I need XMP for DDR5?
If your DDR5 kit is rated faster than the JEDEC boot default, you’ll still need XMP or EXPO to reach that speed — on most boards, DDR5 doesn’t run at its rated speed by default. Once you’ve confirmed the BIOS supports it, enable the matching profile.
What are the downsides of XMP?
Possible trade-offs include longer first boots while the memory trains, occasional instability with mismatched kits, slightly more power and heat, and warranty wording around overclocking. Extreme kits on weak boards may need a lower profile. For Profile 1 settings, these trade-offs are usually minor.
Safely Turn On XMP for Better Memory Performance
With a single BIOS setting, Extreme Memory Profile runs your RAM at its advertised frequency, timings and voltage instead of the slow JEDEC defaults. Make sure the kit, board and firmware all play nicely, enable Profile 1, save, and then check the speed in Windows. On modern AMD systems, prefer EXPO over a milder option if training doesn’t take. Explore GEEKOM’s mini PC range and pick a model that fits your RAM and workload for a small desktop with solid memory configurations and easy setup.