“Bare metal programming” puts software right next to the hardware: the program runs on the processor and talks to devices directly, without Windows, Linux, or another all-purpose OS in the middle. You find it in sensors, wearables, bootloaders, and firmware. This article covers what bare metal programming is, how it works, how it differs from regular programming, how software talks to hardware, what a real bare-metal project looks like, and how to start safely.
The Basics of Bare Metal Programming
When you do bare metal work, your software runs on hardware. Software like Windows or Linux does not manage memory, processes, or drivers. With the help of registers and memory-mapped I/O, the programme controls the processor and its peripherals.
For the most part, desktop apps keep your code running on top of the machine. When your app needs to draw a window, write a file, or connect to a network service, the operating system does all the work. It manages files, loads drivers, and decides how different programmes can share the computer. It also decides when your process runs.
When you use bare metal programming, there is no OS layer between your code and the hardware. Your code only takes care of the things that the machine needs right away. It could be setting up an LED, a temperature sensor, a clock, or a serial port. It could set up graphics, take input, plan tasks, and load a second-stage programme for a bigger project. In the background, there’s no desktop, no process manager, and no OS service making decisions on your behalf.
It is helpful to be this direct when you need precise timing, low power use, small code, or full control. There is no need for a window manager in any of the microcontrollers in your washer. It must be able to read inputs, run a motor safely, and react at the right time. Bootloaders only do a few things as well. They hand off control and get the computer ready for the next piece of software.
What It Really Means to “Bare Metal”
The term is a metaphor. “Metal” refers to the computer’s processor, memory, pins, and any electronics that are connected to them. “Bare” means that there is no operating system layer in between your programme that you compiled and that hardware. There is a chance that your project will still need firmware, a boot ROM, a hardware abstraction library, or an RTOS. The main point is that a full operating system does not run your computer for you.
That difference matters. Conventional development isn’t automatically better, faster, or safer than bare metal development — it’s a different set of trade-offs. You gain more control and clearer timing, but you also take on the jobs an operating system would normally handle for you. If you put the wrong value in a register, it could damage data, stop a peripheral from working, or even lock up the processor. At this level, read carefully, test as you go, and document what you do.
Bare Metal Still Isn’t the Same as Assembly
Many people new to bare metal programming assume it means writing everything in assembly. Assembly is still genuinely useful in specific places — reset and startup code, interrupt vectors, and task switching — but it isn’t the whole picture. C is used for most bare-metal work these days. As a project grows, C becomes useful because it lets you make direct changes to memory and binary layout.
More structured embedded projects can also use C++, but you need to be careful with runtime features like dynamic allocation and exceptions. More people are interested in Rust because its ownership rules catch some memory problems before the program gets to the device. Bare metal tells you where the software runs and how it gets to the hardware, so you do not have to write every line in Assembly.
Regular Programming and Bare Metal: The Practical Difference
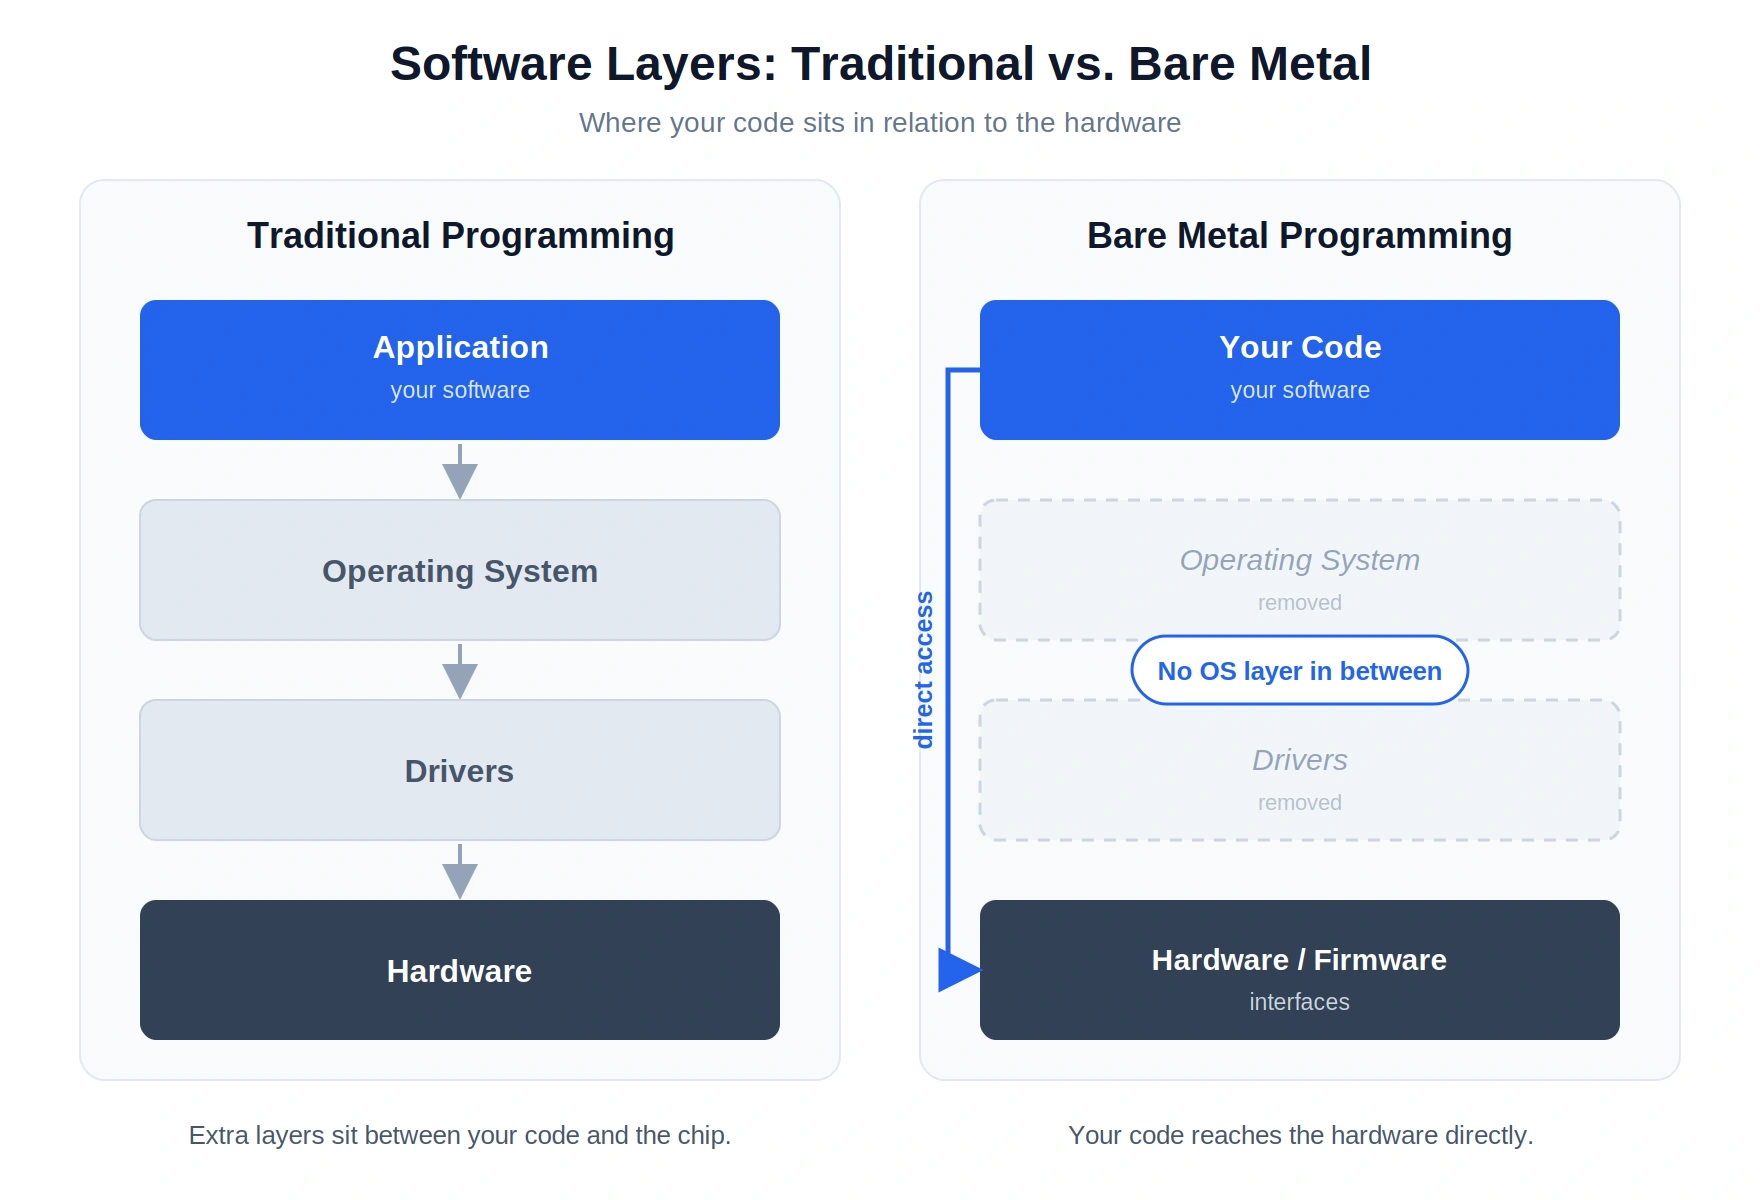
A look at the software layers will help you understand the difference better. Usually, when you make an app, you use the services that an operating system provides. In bare metal development, you use your own code, a small library, or nothing at all to replace those services.
| Responsibility | Traditional Programming | Bare Metal Programming |
| Memory management | OS-managed | Manual or deliberately limited |
| Multitasking | OS scheduler | Your main loop, interrupts, or your own scheduler |
| Drivers | Provided by the OS | You write, configure, or integrate them |
| File system | Built in | Usually absent unless you add one |
| I/O access | OS calls and application interfaces | Direct register access |
| Startup | The OS loads your app | You write or supply the boot and startup code |
| Timing | Often non-deterministic | More deterministic when designed carefully |
Usually, an operating system takes care of scheduling, memory protection, drivers, files, processes, and I/O. That work either falls to you on bare metal or does not exist at all. A small LED controller does not need a file system. Adding one makes the software bigger and harder to follow. A device that controls a drone motor, though, might need timers, interrupts, watchdogs, and strict safety rules built right into the programme.
This is why a bare-metal programme can look simple and still demand a lot from you. The finished binary may be tiny, but nothing is there by accident. Vague thinking does not last long at this level.
How Bare Metal Code Actually Runs
A bare metal programme starts in a fixed spot in memory, talks to hardware through registers, and begins as soon as the processor turns on or comes out of reset. A microcontroller and a modern PC differ in details, yet their startup paths follow the same rough order: prepare a safe execution environment, initialise the machine, then hand control to your programme logic.
The boot process
A processor does not know about your main() function as soon as it gets power. It starts at a known address called the reset vector. In a microcontroller, that spot usually leads to a vector table holding the starting stack address and the first instruction to run. After setting up the clocks and stack, the startup code copies initialised global data from non-volatile storage to RAM, clears any uninitialised data, and then goes to main().
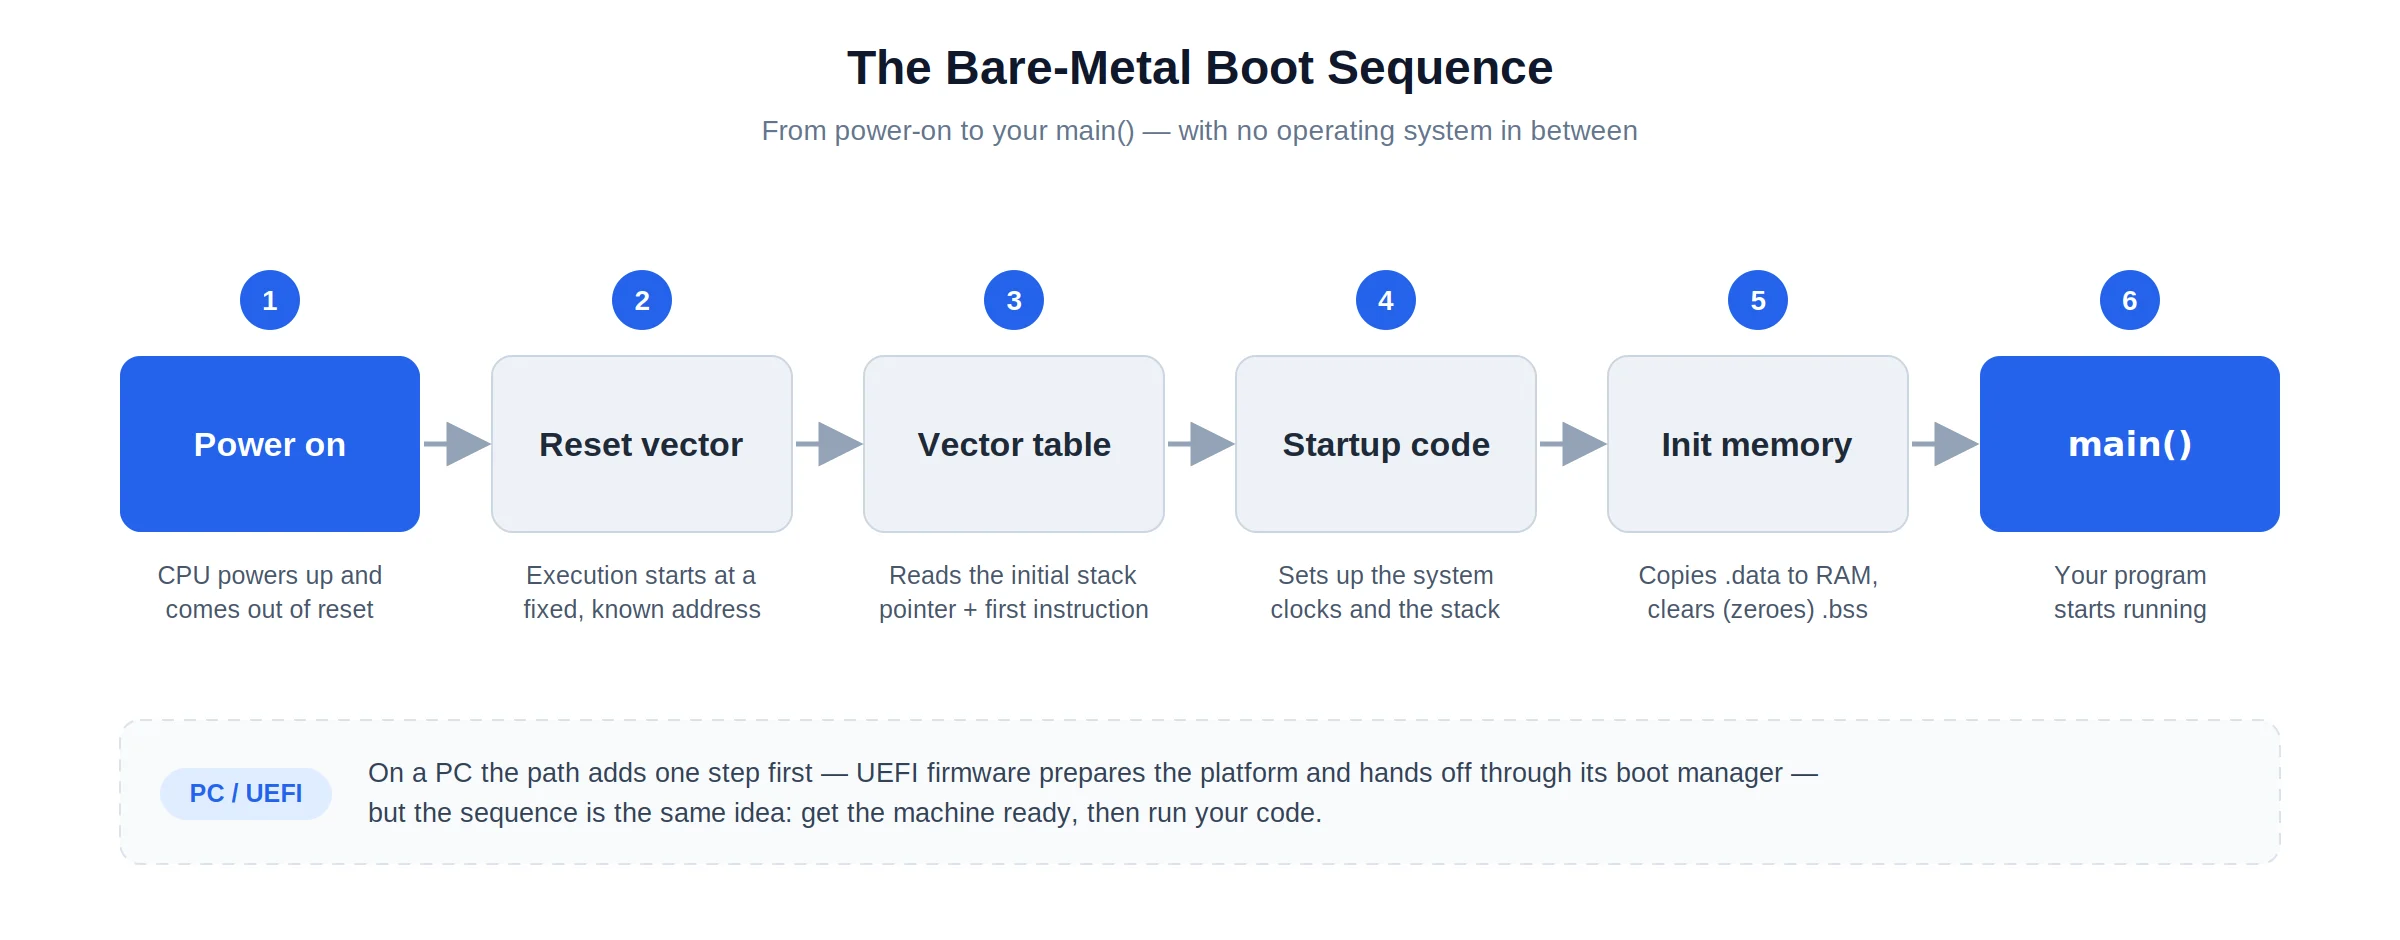
The path has an extra step on a PC. The UEFI firmware sets up the platform and loads a specific UEFI application or bootloader using its boot manager. The UEFI Boot Manager specification describes the firmware-led handoff, including image loading and the moment execution begins. A bare-metal PC experiment can therefore happen before Windows or Linux, but it still starts in a firmware environment that has already set up important parts of the platform.
That startup sequence is very different from normal development. Before your first line of code runs in a normal C programme, the operating system has already set up memory, passed command-line arguments, and loaded shared libraries. In bare metal, you are much closer to the point where power turns into executable code.
Running instructions without a scheduler
Once the compiler and linker have done their work, your source code becomes instructions for the processor. The CPU fetches the next instruction, works out what it means, runs it, and moves on. On a desktop, the operating system scheduler decides when your programme gets CPU time. Bare metal has no general-purpose scheduler making that choice. Your main loop keeps going until an interrupt occurs, you enter a low-power state, or your own code changes the flow.
That direct control helps with how things work in real time. Every millisecond, you can set a timer to interrupt the CPU, do a known task, and then go back to the main loop. You cannot always be sure of what will happen—cache misses, interrupt priorities, and slow peripherals still play a role—but you can see the timing path much better.
Memory: Flash, RAM, and the Memory Map
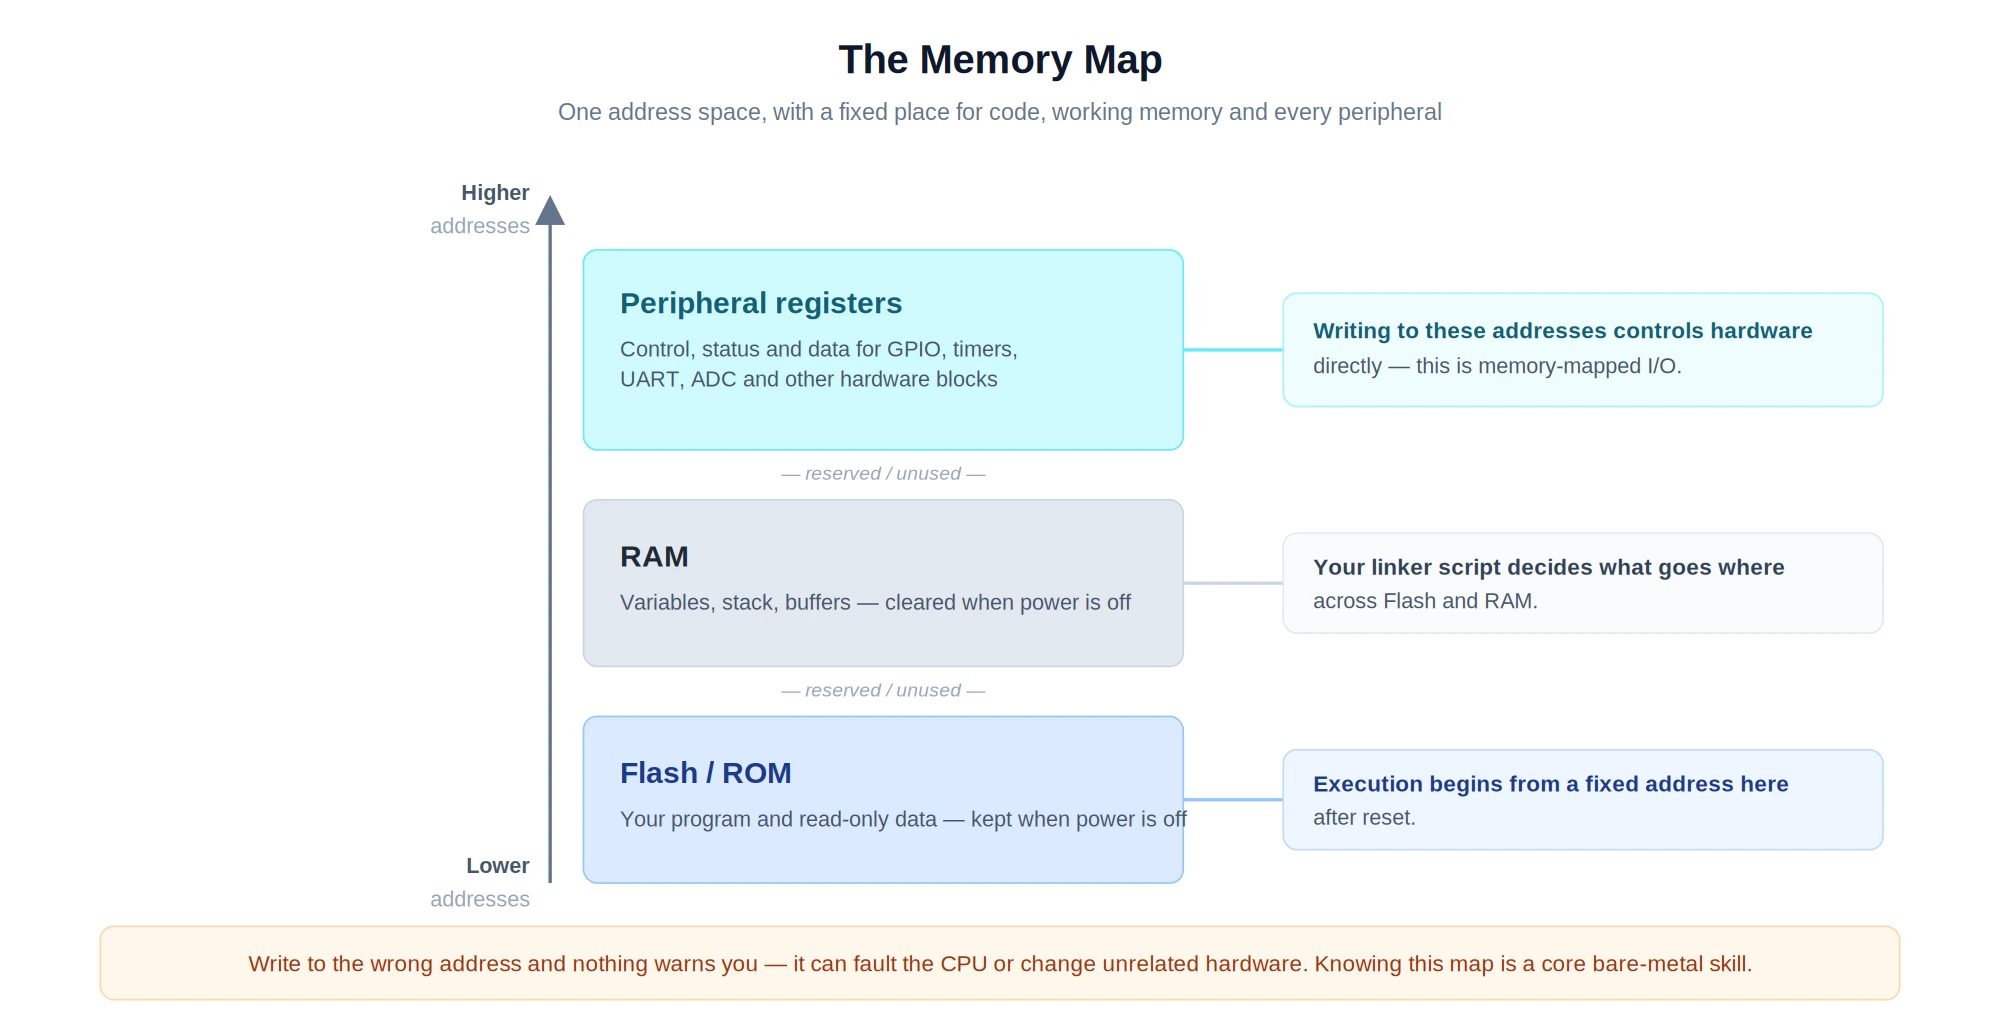
Most embedded systems work with two main storage areas. Flash or ROM keeps the programme when power goes away. RAM is the working area for variables, stacks, buffers, and temporary data. Your linker settings tell the toolchain where code, read-only data, initialised variables, and uninitialised variables belong.
The memory map shows the memory locations for the whole device. It shows where Flash starts, where RAM ends, and where the control registers for each peripheral are located. The CPU will not politely tell you if you write to the wrong address. It could trigger a fault or change a hardware state that has nothing to do with it. Understanding this map is an essential bare-metal skill, not just extra reading.
Registers: Hardware Controls vs. CPU Storage
“Register” can be confusing for new developers because it can mean two different but related things. CPU registers are small places to store data inside the processor. Some of them are the program counter, which finds the next instruction, the general-purpose registers for calculations, and the stack pointer, which keeps track of the current call stack.
There are different peripheral registers. They are places in hardware that define how to control, show status, and store data for things like timers, GPIO blocks, serial ports, and ADCs. One bit for each physical pin can be in a GPIO output register. If a timed event has happened, a timer status register may show it. It is possible for a UART data register to hold either the next byte to send or the most recent byte received. The chip’s reference manual gives you fixed addresses that you can use to get to these hardware registers.
How software and the real world interact: peripherals
The useful parts of a device are the hardware that surrounds the CPU. You can read a button or drive an LED with GPIO. UART lets you easily talk to a computer or another module over serial. Timers make precise delays and events that happen at set times. An ADC takes a voltage from an analogue sensor and turns it into a digital value. I²C and SPI let you connect boards, sensors, storage chips, and screens.
Write bit patterns to registers to set up these modules from a programmer’s point of view. You can choose a clock source, set a pin mode, turn on a peripheral, and wait for a status flag. The work is very precise, and it is also very real: just a few lines of C code can move a motor or show a sensor reading in a terminal.
Memory-Mapped I/O: When Hardware Behaves Like Memory
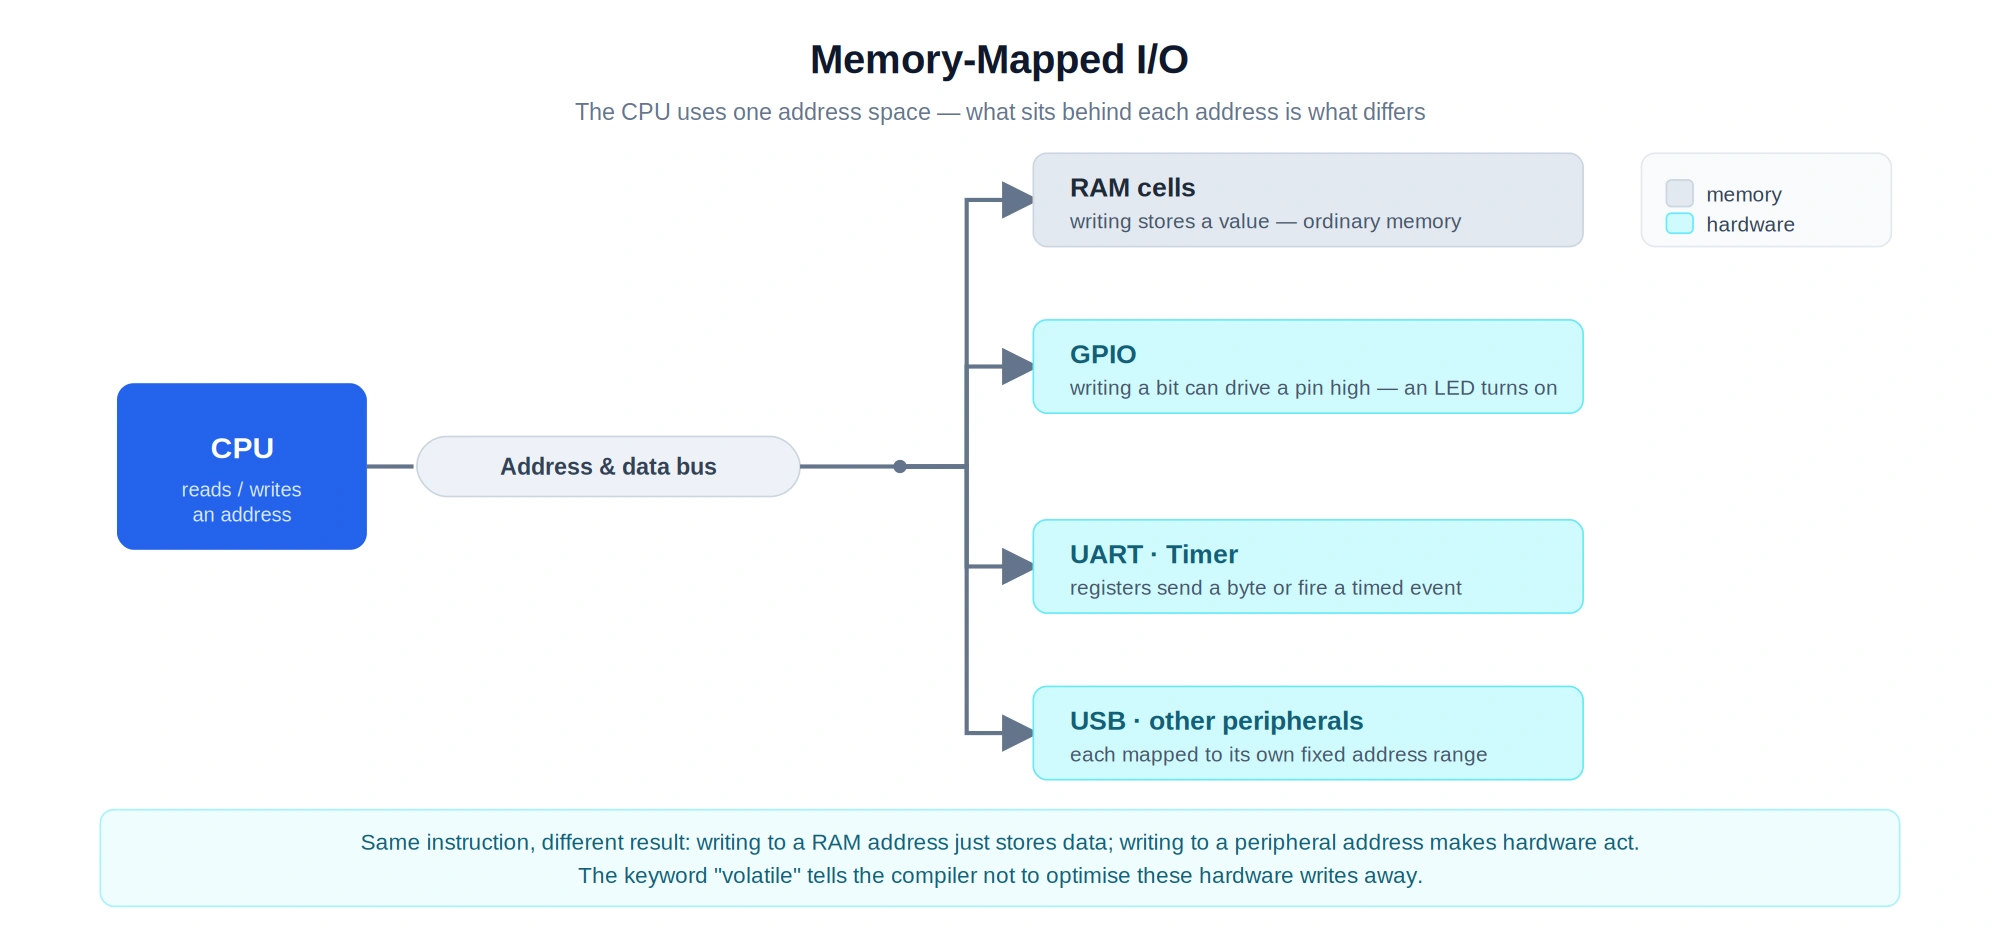
The trick that makes hardware control look like normal memory access is memory-mapped I/O. While using regular RAM, writing the number 100 to an address stores that number there. When you write 1 to a certain address in memory-mapped I/O, a physical pin may go high and an LED may turn on.
The processor thinks of RAM and peripheral registers as being in the same address space. What lives behind the address makes the difference. One area could connect to RAM cells, and another could connect to the UART, timer, USB controller, or GPIO hardware. The microcontroller’s reference manual tells you what each address and bit means.
/* Illustrative only: the address and bit will be different on your board. */
volatile unsigned int *gpio_output = (volatile unsigned int *)GPIO_OUTPUT_ADDRESS;
*gpio_output |= LED_PIN_MASK;   /* Set the LED pin high */
The keyword volatile is important here. It tells the compiler that a value can change outside the normal programme flow, or that a write has an observable hardware effect. If it is not there, an optimiser could get rid of a register read that it thinks is unnecessary or group writes together in a way that breaks the device. When you use volatile, the compiler cannot treat hardware I/O like regular memory. It does not make the code thread-safe or replace proper synchronisation.
That small difference shows why bare metal needs discipline. At this level, you are not calling a friendly “on” button for an LED. You are choosing which bit in the registers stands for that action and writing it on purpose.
The Languages People Use for Bare Metal
One of the most common languages used to start learning bare metal programming is C. It works well with pointers, memory addresses, bitwise operations, structures, and data with a fixed size. Also, toolchains are ready for almost every type of microcontroller. Some developers use “bare metal C,” which means writing C code without using an operating system or a heavy framework.
Assembly is closer to the set of instructions that the processor uses. You can use it to spell out the exact first instructions that run after reset, make an interrupt vector table, change CPU modes, or look into how a compiler interprets code. It is not always the best idea to write an entire embedded project in Assembly, though. It is more difficult to keep up, review, and move around.
Classes and templates in C++ can help keep bigger embedded programming projects more organised. You should not make assumptions that work on a desktop but not on a small target. Instead, you should know how long each feature takes to run. It is not always right to use dynamic allocation, exceptions, and a lot of standard library features.
Rust is getting more and more attention because it can provide low-level control without many of the memory safety issues that come with C. The official Embedded Rust Book explains how to use Rust for no-std, hardware-level development. It is a good choice once you understand how hardware works, but C is still the best way to read most vendor examples and reference materials.
You do not have to write all of your code in Assembly for bare metal programming. Pick the language that gives your project the safety, control, tool support, and ease of maintenance it needs.
What You Can Actually Build with Bare Metal
Projects for microcontrollers
Most of the time, your first projects are small and simple. For example, you might blink LEDs, read a sensor, control a servo, log measurements through UART, or make firmware for an IoT device or wearable. These examples show you the basics without giving you a whole operating system to learn.
Software for the system
RTOS kernels, simple operating systems, bootloaders, and device firmware all use bare-metal techniques at the next level. A bootloader might look for a valid firmware update, make sure it has the right signature, copy it into Flash, and then hand off control. Even if an RTOS has a scheduler and message queues, it still needs the low-level work to start up, map memory, and handle interrupts.
Experiments in PC Class
When used with x86-64 hardware, “bare metal” can mean writing UEFI apps, exploring boot code, making a small operating system, or testing low-level graphics. The ideas are the same, but the platform is harder to understand. You can use multiple cores, up-to-date graphics interfaces, and a lot of RAM. You also have to deal with firmware services and a much bigger hardware ecosystem.
A Game Without an OS Shows How Bare Metal Programming Works
The idea is much more real now than it was in an LED demo. As a UEFI application, developer Inkbox recreated the isometric arcade game Zaxxon from 1982 in x86-64 Assembly. One way to put the executable file BOOTX64.EFI is in the EFI/BOOT/ directory of the EFI System Partition on a GPT disk. The test setup does not use Secure Boot, so the PC can go straight from firmware to the game, without Windows or Linux.
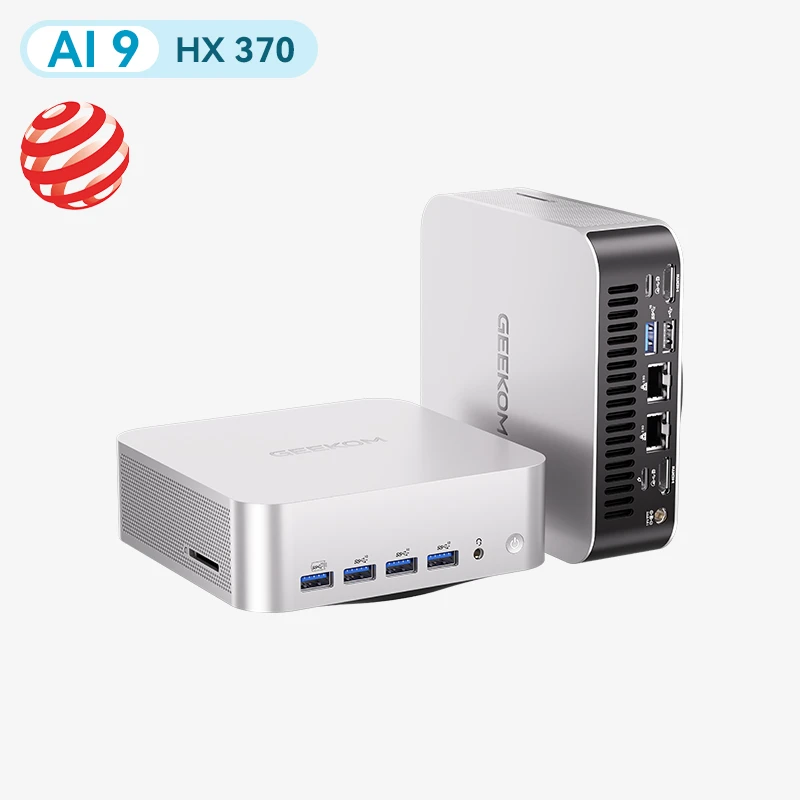
As shown in the project’s demonstration video, Inkbox developed and tested the game on a GEEKOM A9 Max mini PC(Ryzen AI 9 HX 370). It shows how much of a typical game stack you normally take for granted. For the game to run smoothly, Inkbox had to read the system clock correctly, find the Graphics Output Protocol (GOP), use BLT operations to write pixels, and switch from keyboard input to mouse input to bypass the UEFI keyboard-input delay. It also used extra CPU cores to go from a 256×256 buffer to a 1024×1024 buffer and made a rendering engine that looks like a PPU from an old console.
The build has no sound, but in the video the remake runs at roughly 128 frames per second. Also shown are the real-world problems the developer had to solve with graphics, timing, and keyboard input. The Graphics Output Protocol documentation for UEFI explains why GOP is useful in this case: it gives you basic graphics output before your operating system starts up.
One technical point needs to be clear. Calling this “a game without an operating system” makes sense because it does not use Windows or Linux. Still, some low-level developers describe UEFI as a minimal operating environment because it has Boot Services and Runtime Services. You can defend both views. The game does not run on a normal desktop operating system; it runs directly under firmware services.
Learn How to Begin Bare Metal Programming
Step 1: Learn the basics of C
Start with the basics of C that are important at the hardware level, like pointers, bit manipulation, structs, fixed-width integer types, and volatile. Before you touch a board, you do not have to know every hard word in the language. You should know why a pointer can be an address and why value |= (1U << bit) can change one bit without changing the others.
Step 2: Learn about the Memory and CPU
Find out what an address space, a memory map, a stack, a heap, Flash, RAM, and function calls are and how they work. Stack size is not an invisible resource on bare metal; it is a design choice. People who work on safety-sensitive firmware may not be able to use or choose to avoid dynamic memory allocation.
Step 3: Learn a lot about Memory-Mapped I/O and Registers
This is the most important skill. As you go from the reference manual to the code for one peripheral, like GPIO, pick one and follow the steps. Find the needed bits, the clock-enable register, the pin-mode register, and the output-data register. If this is your first LED project, do not use a vendor’s Hardware Abstraction Layer. The HAL will come in handy later, but writing the first version register by register will teach you how the library works.
Step 4: Getting used to a Microcontroller Datasheet
You could start with a Raspberry Pi Pico, an STM32 “Blue Pill,” or an ESP32 board. The Pico is easy to use because it comes with a lot of documentation. The official Raspberry Pi Pico datasheet is a good place to start learning about the board and its RP2040 microcontroller. Start with the memory map and pinout, then move on to the chapters about the peripherals. You do not have to read a 1,000-page reference book from beginning to end. Learn how to find the register description that fits the job you have at hand.
Step 5: Build a small project
You can make an LED blink without using a vendor HAL. Set the clock and the GPIO mode, and then set and clear the output bit. Even though it is a small project, it shows that you can compile code, flash it to hardware, read a memory map, and control a real chip. If it does not work, you need to debug it. Check the pins, make sure the clock is correct, read over the register bit definitions again, and make the code easier to understand.
Step 6: Move on to Timers and Interrupts
You can go beyond toy examples with timers and interrupts. With a timer interrupt, you can set up a task to run at regular intervals without locking up the whole system in a delay loop. An external interrupt lets a sensor signal or button press start a quick response. Learn about interrupt priorities and keep interrupt handlers short. Work that takes too long should go back to the main loop or be put off until later.
Step 7: Take on something harder
Once you know how to use GPIO, UART, and timers, you can make a UART console, a small bootloader, a minimal cooperative scheduler, or use a spare PC to try out a UEFI application. It is no longer just peripherals at this point. It teaches you how a computer works and how software handles each part of the machine.
Using a Mini PC for Bare-Metal Work
Indeed, an x86-64 mini PC is a useful platform for developing UEFI apps, boot processes, Assembly, and operating systems. This is because it gives you real PC hardware that you can restart many times without risking your main computer.
As the architecture is the same as that used in desktop PCs (x86/x64), skills related to calling conventions, memory layout, UEFI, and bootloaders can be used right away. Its UEFI firmware lets you make EFI apps and boot them. You can try out multicore scheduling or rendering tasks if you have more than one CPU core. Enough RAM and SSD storage make it easy to work with compilers, emulators like QEMU, disk images, and virtual machines.
Using a mini PC for two different things at once is also helpful. You can build on Windows or Linux, test in QEMU first, and then switch to a bare-metal environment when you are ready. Because it does not take up much space, a separate test computer can sit next to your main computer instead of taking up the whole desk.
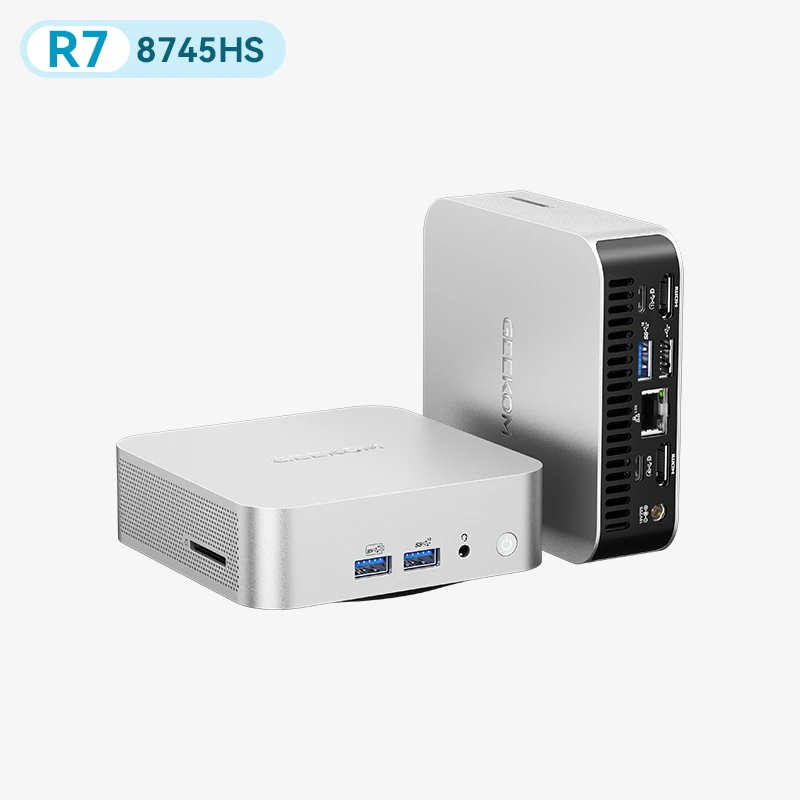
GEEKOM A8 Mini PC
The GEEKOM mini PC range is a good place to start for experiments that are not too complicated. You can use an A8 mini PC as a small development box for testing UEFI and virtual machines.
GEEKOM A9 Max Mini PC
The A9 Max gives you more headroom for complex toolchains and multi-core experiments. You can see from the Zaxxon project that a small modern PC can also be a good place to run firmware-level software.
FAQs
Does embedded programming mean the same thing as bare metal programming?
Not really. Embedded programming is the process of putting software into a specific device. Bare metal programming is the process of running software without an operating system. Some embedded projects use an RTOS or embedded Linux, while others are bare metal. Your PC-class hardware can also run bare-metal software if you use UEFI or your own boot code.
Do you need Assembly to programme bare metal?
Not at all. Most new and experienced firmware developers use C for the bulk of a bare-metal project. Assembly usually covers startup code, interrupt entry points, task switching, and routines tied closely to the hardware. Basic Assembly is still worth learning because it shows what happens before the main() function in C code.
What in bare metal C is volatile?
The keyword volatile tells the compiler that a value could change outside of normal programme flow or that reading and writing it clearly changes it. Usually, hardware registers and data changed by interrupts use this. It does not offer atomicity, locking, memory ordering, or thread safety, so you will still need to use the right synchronisation methods when needed.
Can you programme in bare metal with C++?
Yes. A lot of embedded systems that are more complicated use C++ because classes, templates, and stronger abstraction can help keep things organised. You need to be careful when picking features because large runtime libraries, dynamic allocation, and exception handling might not work with a device that has limited memory or strict timing needs.
Is programming for Arduino bare metal?
Arduino sketches can run without an operating system, which puts them close to “bare metal.” The Arduino framework still hides register details behind simple libraries like digitalWrite(). That makes learning easier, but direct register programming shows you more of what the hardware is doing.
Is it possible for bare metal code to use a file system?
Yes, but a file system is not always available. You need to add the right file-system library and the right storage driver if your project needs to use an SD card, USB storage, or Flash-based files. Fixed memory areas and direct data structures are smaller and more reliable, so simple devices do not need file systems at all.
How bare metal programming changes the way you think about code
You can see how software turns into physical action in a way that is not possible with other programming languages. You learn about the beginning of a programme, the organisation of memory, the significance of registers, and how a single bit can manage a real device. Start with C, a board that has a lot of information on it, a simple LED project, and the ability to read reference guides slowly. It is then possible to work on things like timers, serial consoles, bootloaders, and UEFI applications that were once mysteries. For PC-class experiments, a small dedicated system like a GEEKOM mini PC lets you test, restart, and learn without having to bother your main workstation.